Ipsecvpn
| Line 1: | Line 1: | ||
{{DISPLAYTITLE:IPSec Tunnels}} | {{DISPLAYTITLE:IPSec Tunnels}} | ||
| − | IPSec | + | == IPSec Tunnels == |
| − | + | ||
| − | [[File:faq_ipsec001.png]] | + | This modules can build IPSec tunnels between multiple WFilter ROS networks, and make a secure site-to-site VPN. |
| − | + | The number of IPSec Tunnels depends on your hardware performance, there is no software limit on the tunnels number. | |
| + | |||
| + | == IPSec Tunnel Settings == | ||
| + | |||
| + | Before you setup a IPSec tunnel, you need to design your tunnels. Only a network with a static internet ip addresse can act as a tunnel server. For example: | ||
| + | * Suppose you have 3 network: A, B, C. | ||
| + | * A has a static public IP, B and C ip addresses are dynamic. | ||
| + | The solution will be: | ||
| + | * Create a tunnel in A network, set "Remote IP" to "Any". | ||
| + | * Create tunnels in B and C networks, set "Remote IP" to A's public ip address. | ||
| + | * Now the tunnels are ready. A, B, C now are in a VPN network. The tunnels are between A&B and A&C. Since there is no tunnel between B and C, B and C can not visit each other. | ||
| + | |||
| + | Description of tunnel settings: | ||
| + | * Name: tunnel name. | ||
| + | * Interface: WAN interface to setup the tunnel. | ||
| + | * Local Subnet: local subnet to be connected with the tunnel. | ||
| + | * Remote IP: another side of the tunnel, "Any" to allow any others to connect. | ||
| + | * PreShare Key: tunnel secrect key. With a correct key, the tunnel can not be established. | ||
| + | * IKE, ESP: alghrom for authentication and transfer. Both sides of the tunnel shall have the same alghrom. | ||
| + | |||
| + | [[File:faq_ipsec001.png|650px]] | ||
| + | |||
| + | '''Notice''': Access of tunnels are also applied with [[Firewallrule|firewall rules]]. For example, if you want to block VPN tunnels users from accessing a local server, you need to setup a firewall rule to block the target server ip from WAN interface. | ||
| + | |||
| + | == Tunnel Status == | ||
| + | |||
| + | Move your mouse into the "state" icon, you will see the tunnel status and connected clients. | ||
| + | |||
| + | [[File:faq_ipsec002.png|800px]] | ||
== FAQ == | == FAQ == | ||
Revision as of 17:51, 24 December 2015
Contents |
1 IPSec Tunnels
This modules can build IPSec tunnels between multiple WFilter ROS networks, and make a secure site-to-site VPN. The number of IPSec Tunnels depends on your hardware performance, there is no software limit on the tunnels number.
2 IPSec Tunnel Settings
Before you setup a IPSec tunnel, you need to design your tunnels. Only a network with a static internet ip addresse can act as a tunnel server. For example:
- Suppose you have 3 network: A, B, C.
- A has a static public IP, B and C ip addresses are dynamic.
The solution will be:
- Create a tunnel in A network, set "Remote IP" to "Any".
- Create tunnels in B and C networks, set "Remote IP" to A's public ip address.
- Now the tunnels are ready. A, B, C now are in a VPN network. The tunnels are between A&B and A&C. Since there is no tunnel between B and C, B and C can not visit each other.
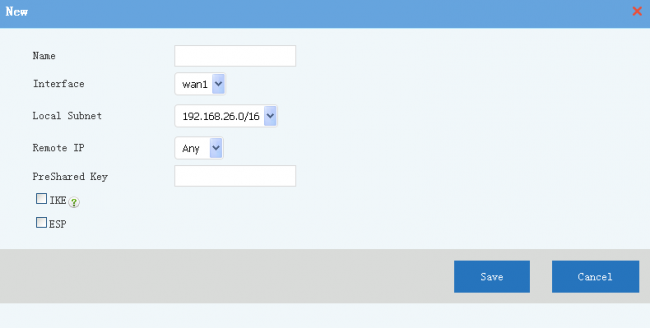
Description of tunnel settings:
- Name: tunnel name.
- Interface: WAN interface to setup the tunnel.
- Local Subnet: local subnet to be connected with the tunnel.
- Remote IP: another side of the tunnel, "Any" to allow any others to connect.
- PreShare Key: tunnel secrect key. With a correct key, the tunnel can not be established.
- IKE, ESP: alghrom for authentication and transfer. Both sides of the tunnel shall have the same alghrom.
Notice: Access of tunnels are also applied with firewall rules. For example, if you want to block VPN tunnels users from accessing a local server, you need to setup a firewall rule to block the target server ip from WAN interface.
3 Tunnel Status
Move your mouse into the "state" icon, you will see the tunnel status and connected clients.
