Ipsecvpn
(→Tunnel Status) |
|||
| Line 2: | Line 2: | ||
== IPSec Tunnels == | == IPSec Tunnels == | ||
| − | This modules can build IPSec tunnels between multiple WFilter | + | This modules can build IPSec tunnels between multiple WFilter NGF networks, and make a secure site-to-site VPN. |
The number of IPSec Tunnels depends on your hardware performance, there is no software limit on the tunnels number. | The number of IPSec Tunnels depends on your hardware performance, there is no software limit on the tunnels number. | ||
| Line 11: | Line 11: | ||
* A has a static public IP, B and C ip addresses are dynamic. | * A has a static public IP, B and C ip addresses are dynamic. | ||
The solution will be: | The solution will be: | ||
| + | * A, B, C shall have differenct subnets. For example: 192.168.10.x, 192.168.20.x, 172.16.1.x. | ||
* Create a tunnel in A network, set "Remote IP" to "Any". | * Create a tunnel in A network, set "Remote IP" to "Any". | ||
* Create tunnels in B and C networks, set "Remote IP" to A's public ip address. | * Create tunnels in B and C networks, set "Remote IP" to A's public ip address. | ||
| − | * Now the tunnels are ready. A, B, C now are in a VPN network. The tunnels are between | + | * Now the tunnels are ready. A, B, C now are in a VPN network. The tunnels are between AB and AC. |
| + | * To enable access between B and C, you need to setup routering rules and enable FORWARD in A. | ||
Description of tunnel settings: | Description of tunnel settings: | ||
| Line 20: | Line 22: | ||
* Local Subnet: local subnet to be connected with the tunnel. | * Local Subnet: local subnet to be connected with the tunnel. | ||
* Remote IP: another side of the tunnel, "Any" to allow any others to connect. | * Remote IP: another side of the tunnel, "Any" to allow any others to connect. | ||
| − | * Remote Subnet: remote LAN | + | * Remote Subnet: remote LAN subnets which will be forwarded to the tunnel. |
* PreShared Key: tunnel secret key. With a correct key, the tunnel can not be established. | * PreShared Key: tunnel secret key. With a correct key, the tunnel can not be established. | ||
* Start: Manually or Automatically. | * Start: Manually or Automatically. | ||
| Line 44: | Line 46: | ||
[[File:ipsec03.png|1000px]] | [[File:ipsec03.png|1000px]] | ||
| − | == | + | == A site to site ipsec vpn sample == |
| + | |||
| + | Suppose you have 3 networks: | ||
| + | * Headquarter A, static public ip address, LAN subnet is 192.168.10.0/24. | ||
| + | * Branch B, PPPoE internet access, LAN subnet is 192.168.30.0/24. | ||
| + | * Branch C, PPPoE internet access, LAN subnet is 172.16.1.0/24. | ||
| + | Now let me guide you to build a virtual private network(VPN) for these three locations. | ||
| + | |||
| + | === Settings for Headquarter A === | ||
| + | * Setup the IPSec tunnel | ||
| + | [[File:ipsec_center01.png|800px]] | ||
| + | |||
| + | [[File:ipsec_center02.png|800px]] | ||
| + | |||
| + | * Enable forwarding of branches | ||
| + | Without this setting, branches can access headquarter, but no access between branches. | ||
| + | [[File:ipsec_center03.png|800px]] | ||
| + | |||
| + | === Branch B === | ||
| + | * Setup the IPSec tunnel | ||
| + | [[File:ipsec_client01.png|800px]] | ||
| + | * Add a routing rule to branch C | ||
| + | Set branch C's LAN subnet to "Destination", set headquarter A's public IP to "Gateway". Without this routing rule, branch B can not access branch C. | ||
| + | |||
| + | [[File:ipsec_client02.png|600px]] | ||
| + | |||
| + | === Branch C === | ||
| + | * Setup the IPSec tunnel | ||
| + | [[File:ipsec_client03.png|800px]] | ||
| + | * Add a routing rule to branch B | ||
| + | Set branch B's LAN subnet to "Destination", set headquarter A's public IP to "Gateway". Without this routing rule, branch C can not access branch B. | ||
| + | |||
| + | [[File:ipsec_client04.png|800px]] | ||
| + | |||
| + | By above steps, A,B,C are now in a virtual private network. If you don't want access between B and C, there is no need to add the firewall and routing rules. | ||
| + | |||
[[Category:VPN]] | [[Category:VPN]] | ||
Revision as of 17:43, 13 June 2017
Contents |
1 IPSec Tunnels
This modules can build IPSec tunnels between multiple WFilter NGF networks, and make a secure site-to-site VPN. The number of IPSec Tunnels depends on your hardware performance, there is no software limit on the tunnels number.
2 IPSec Tunnel Settings
Before you setup a IPSec tunnel, you need to design your tunnels. Only a network with a static internet ip address can act as a tunnel server. For example:
- Suppose you have 3 network: A, B, C.
- A has a static public IP, B and C ip addresses are dynamic.
The solution will be:
- A, B, C shall have differenct subnets. For example: 192.168.10.x, 192.168.20.x, 172.16.1.x.
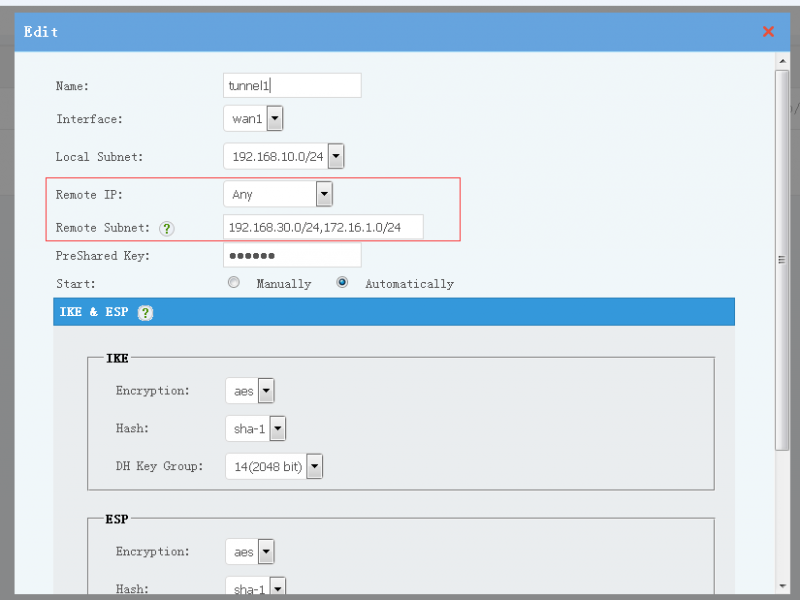
- Create a tunnel in A network, set "Remote IP" to "Any".
- Create tunnels in B and C networks, set "Remote IP" to A's public ip address.
- Now the tunnels are ready. A, B, C now are in a VPN network. The tunnels are between AB and AC.
- To enable access between B and C, you need to setup routering rules and enable FORWARD in A.
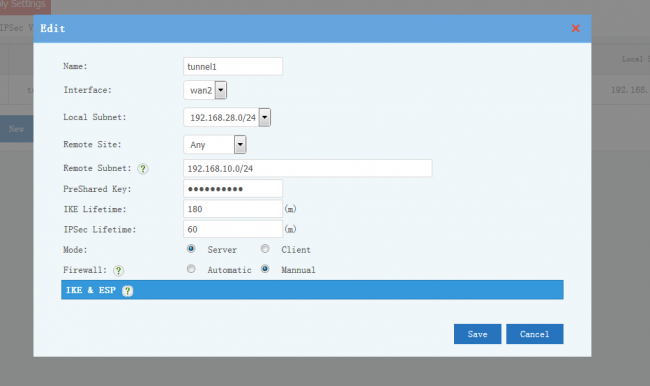
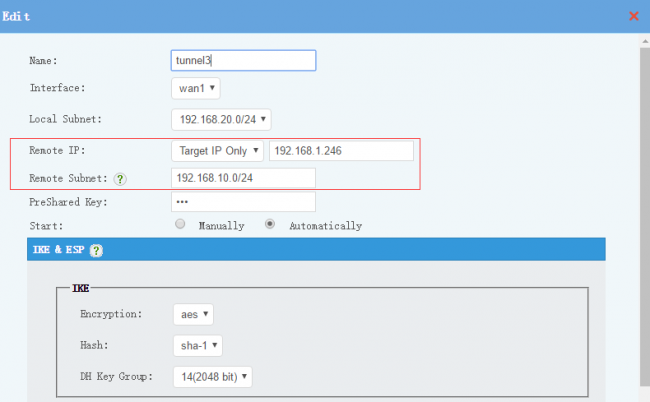
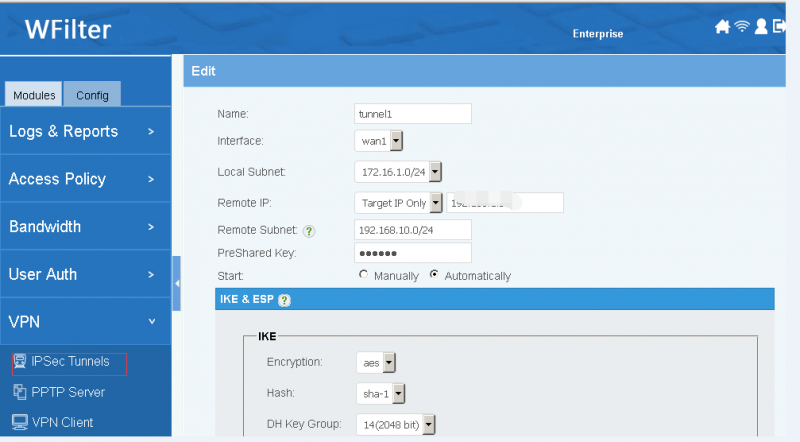
Description of tunnel settings:
- Name: tunnel name.
- Interface: WAN interface to setup the tunnel.
- Local Subnet: local subnet to be connected with the tunnel.
- Remote IP: another side of the tunnel, "Any" to allow any others to connect.
- Remote Subnet: remote LAN subnets which will be forwarded to the tunnel.
- PreShared Key: tunnel secret key. With a correct key, the tunnel can not be established.
- Start: Manually or Automatically.
- IKE, ESP: algorithm for authentication and transfer. Both sides of the tunnel shall have the same algorithm.
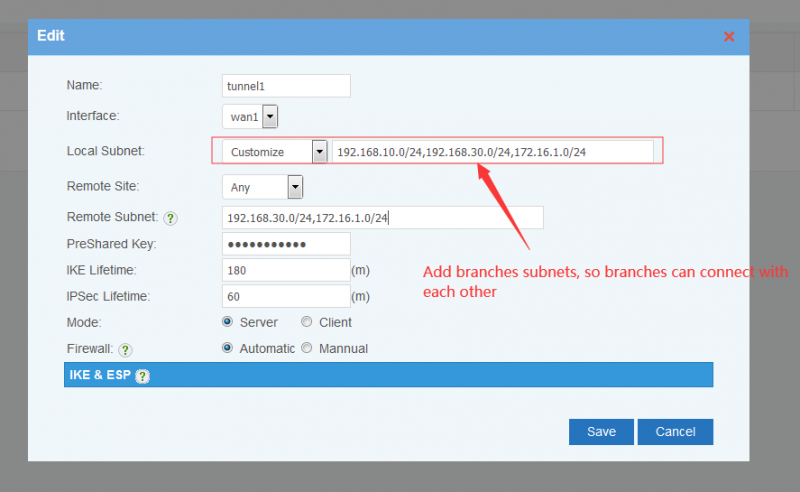
Server side settings examples:
Client side settings examples:
Notice:
- Access of tunnels are also applied with firewall rules. For example, if you want to block VPN tunnels users from accessing a local server, you need to setup a firewall rule to block the target server ip from WAN interface.
- If you enable DMZ or "Static NAT", please add IPSec port "500,4500" to "port exception". Otherwise, IPSec connections can not be established.
- If the WAN interface has multiple static ip addresses, IPSec only listens in the first IP address.
3 Tunnel Status
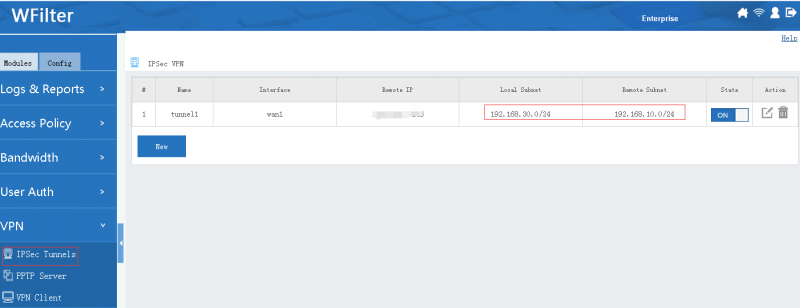
Move your mouse into the "state" icon, you will see the tunnel status and connected clients.
4 A site to site ipsec vpn sample
Suppose you have 3 networks:
- Headquarter A, static public ip address, LAN subnet is 192.168.10.0/24.
- Branch B, PPPoE internet access, LAN subnet is 192.168.30.0/24.
- Branch C, PPPoE internet access, LAN subnet is 172.16.1.0/24.
Now let me guide you to build a virtual private network(VPN) for these three locations.
4.1 Settings for Headquarter A
- Setup the IPSec tunnel
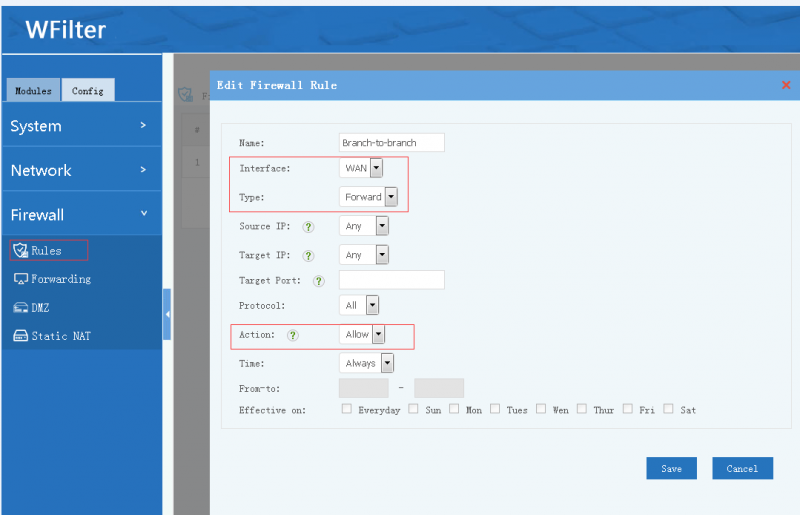
- Enable forwarding of branches
Without this setting, branches can access headquarter, but no access between branches.
4.2 Branch B
- Setup the IPSec tunnel
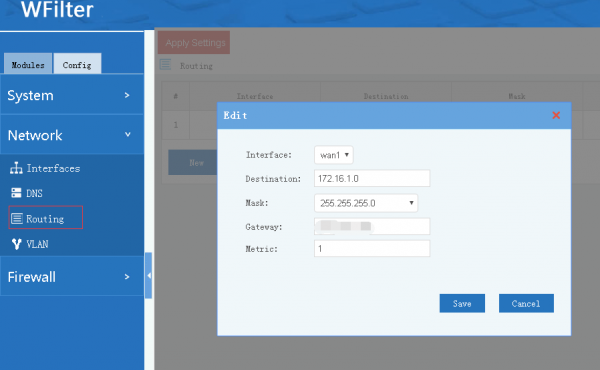
- Add a routing rule to branch C
Set branch C's LAN subnet to "Destination", set headquarter A's public IP to "Gateway". Without this routing rule, branch B can not access branch C.
4.3 Branch C
- Setup the IPSec tunnel
- Add a routing rule to branch B
Set branch B's LAN subnet to "Destination", set headquarter A's public IP to "Gateway". Without this routing rule, branch C can not access branch B.
By above steps, A,B,C are now in a virtual private network. If you don't want access between B and C, there is no need to add the firewall and routing rules.
