VMWareInstallation
From Wiki of WFilter NG Firewall
(Difference between revisions)
(→Configuration) |
|||
| (3 intermediate revisions by one user not shown) | |||
| Line 1: | Line 1: | ||
| − | {{DISPLAYTITLE:Install | + | {{DISPLAYTITLE:Install WFilter NG Firewall in VMware}} |
= Introduction = | = Introduction = | ||
| − | You're recommended to install | + | You're recommended to install WFilter NG Firewall in virtual machines only for preview testing. Please also check: |
| − | * | + | * WFilter NG Firewall in a virtual machine shall work in "gateway" mode. |
| − | * To test a client, you need to modify this client's network settings to use | + | * To test a client, you need to modify this client's network settings to use WFiler NG Firewall as its gateway. |
* Please note: in a vm, since both outgoing and incoming traffic use a same cable, suppose your network connection is 100Mb, you only can get a maximum bandwidth of 50Mb. | * Please note: in a vm, since both outgoing and incoming traffic use a same cable, suppose your network connection is 100Mb, you only can get a maximum bandwidth of 50Mb. | ||
| − | * To install | + | * To install WFilter NG Firewall in a physical PC, please check: [[Installation of WFilter ROS|WFilter NG Firewall Installation Steps]] |
| − | This document demonstrates certain steps to setup a vmware virtual machine running | + | This document demonstrates certain steps to setup a vmware virtual machine running WFilter NG Firewall. |
| − | = Steps to install | + | = Steps to install WFilter NG Firewall in VMware = |
== Creating Virtual Machine == | == Creating Virtual Machine == | ||
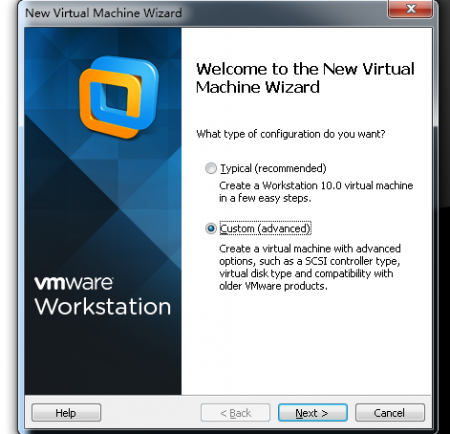
* Choose "Custom(Advanced)" | * Choose "Custom(Advanced)" | ||
[[File:vmware1.png|450px]] | [[File:vmware1.png|450px]] | ||
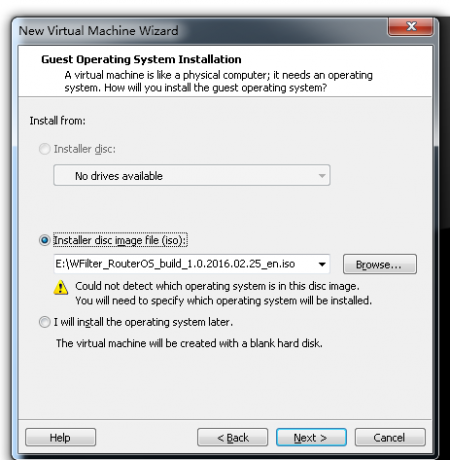
| − | * Choose | + | * Choose WFilter NG Firewall iso as the "Installer disc image file". |
[[File:vmware2.png|450px]] | [[File:vmware2.png|450px]] | ||
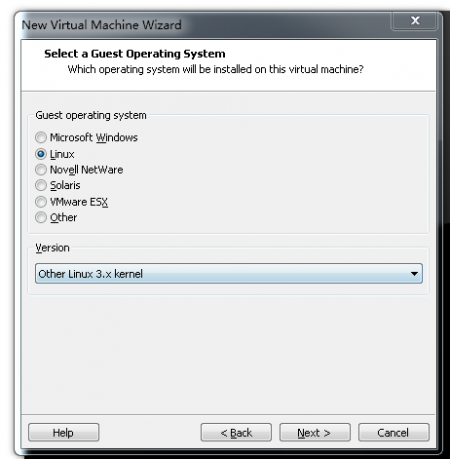
* Choose "Other Linux 3.x Kernel" | * Choose "Other Linux 3.x Kernel" | ||
| Line 22: | Line 22: | ||
[[File:vmware4.png|750px]] | [[File:vmware4.png|750px]] | ||
| − | * Now you may start the virtual machine and begin the installation, please also check [[Installation of WFilter ROS#Installation Steps| | + | * Now you may start the virtual machine and begin the installation, please also check [[Installation of WFilter ROS#Installation Steps|WFilter NG Firewall Installation Steps]] |
== Configuration == | == Configuration == | ||
| − | Add an 192.168.10.x ip in your host pc, then you can access webUI of | + | Add an 192.168.10.x ip in your host pc, then you can access webUI of WFilter NG Firewall via this url: http://192.168.10.1 . Please note: |
* Suppose your existing subnet is "192.168.1.x", with gateway "192.168.1.1". | * Suppose your existing subnet is "192.168.1.x", with gateway "192.168.1.1". | ||
| − | * In "Wizard" of | + | * In "Wizard" of WFilter NG Firewall, please choose "Gateway" and set a "Static" ip to the WAN interface.(For example: 192.168.1.2, netmask 255.255.255.0, gateway 192.168.1.1) |
| − | * Modify ip address of a client device to "192.168.10.x", with gateway "192.168.10.1"(the default lan ip of | + | * Modify ip address of a client device to "192.168.10.x", with gateway "192.168.10.1"(the default lan ip of WFilter NG Firewall). So WFilter NG Firewall can control it. |
| − | * If there is an existing DHCP server in your network. Please disable it. So | + | * If there is an existing DHCP server in your network. Please disable it. So WFilterNGF will act as the DHCP server. All clients with "dynamic ip" will be redirected to WFilter NG Firewall. |
[[Category:Installation]] | [[Category:Installation]] | ||
Latest revision as of 16:07, 25 July 2019
Contents |
[edit] 1 Introduction
You're recommended to install WFilter NG Firewall in virtual machines only for preview testing. Please also check:
- WFilter NG Firewall in a virtual machine shall work in "gateway" mode.
- To test a client, you need to modify this client's network settings to use WFiler NG Firewall as its gateway.
- Please note: in a vm, since both outgoing and incoming traffic use a same cable, suppose your network connection is 100Mb, you only can get a maximum bandwidth of 50Mb.
- To install WFilter NG Firewall in a physical PC, please check: WFilter NG Firewall Installation Steps
This document demonstrates certain steps to setup a vmware virtual machine running WFilter NG Firewall.
[edit] 2 Steps to install WFilter NG Firewall in VMware
[edit] 2.1 Creating Virtual Machine
- Choose "Custom(Advanced)"
- Choose WFilter NG Firewall iso as the "Installer disc image file".
- Choose "Other Linux 3.x Kernel"
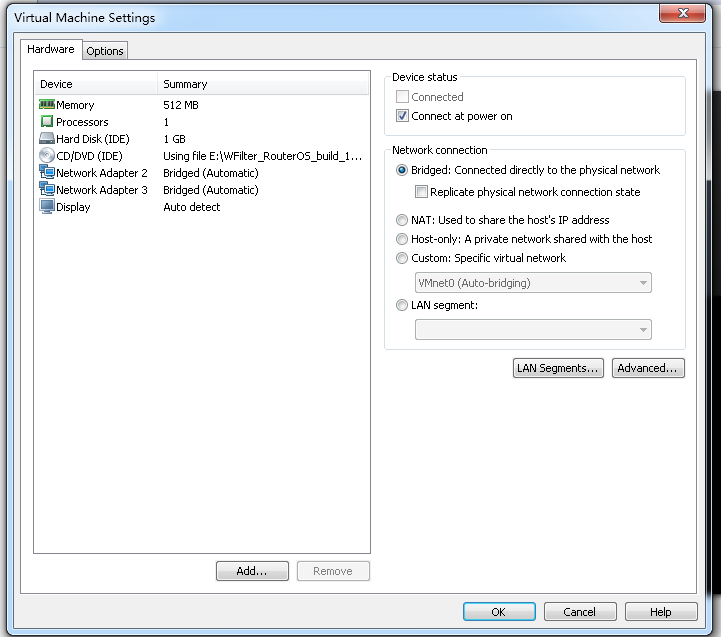
- The final virtual machine settings:
- Now you may start the virtual machine and begin the installation, please also check WFilter NG Firewall Installation Steps
[edit] 2.2 Configuration
Add an 192.168.10.x ip in your host pc, then you can access webUI of WFilter NG Firewall via this url: http://192.168.10.1 . Please note:
- Suppose your existing subnet is "192.168.1.x", with gateway "192.168.1.1".
- In "Wizard" of WFilter NG Firewall, please choose "Gateway" and set a "Static" ip to the WAN interface.(For example: 192.168.1.2, netmask 255.255.255.0, gateway 192.168.1.1)
- Modify ip address of a client device to "192.168.10.x", with gateway "192.168.10.1"(the default lan ip of WFilter NG Firewall). So WFilter NG Firewall can control it.
- If there is an existing DHCP server in your network. Please disable it. So WFilterNGF will act as the DHCP server. All clients with "dynamic ip" will be redirected to WFilter NG Firewall.


