VMWare Image
From Wiki of WFilter NG Firewall
(Difference between revisions)
(Created page with "{{DISPLAYTITLE: Using a pre-built VMWare image of WFilter NG Firewall}} = Introduction = We do provide a pre-built VMWare image of WFilter NG Firewall. In case you want to p...") |
|||
| (14 intermediate revisions by one user not shown) | |||
| Line 3: | Line 3: | ||
= Introduction = | = Introduction = | ||
| − | We do provide a pre-built VMWare image of WFilter NG Firewall. In case you want to preview WFilter NG Firewall without installation, you can download this [http://www.wfilterros.com/downloads/ | + | We do provide a pre-built VMWare image of WFilter NG Firewall. In case you want to preview WFilter NG Firewall without installation, you can download this [http://www.wfilterros.com/downloads/WFilter_ngf_en.zip vmware image of WFilter NG Firewall]. |
| − | + | Please note: | |
| + | * This vm has 1GB RAM and 2GB disk. Only for small networks(less than 50 clients) or features preview. | ||
| + | * Two bridged adapters, one has no IP assigned(WAN), another is assigned with IP 192.168.10.1(LAN interface, DHCP enabled). | ||
| + | * Since these two bridged adapters are based on same physical adapter. You can only get half thoughput of the physical adapter. | ||
| + | * You also can build the virtual machine by yourself, please check: [http://wiki.wfilterros.com/NewUser Install WFilter NG Firewall in a Virtual Machine] | ||
| + | |||
| + | = Import Steps = | ||
* Download the zip file, unzip it into a directory. | * Download the zip file, unzip it into a directory. | ||
* In VMWare workstation, click "Open a Virtual Machine" to open "WFilter NG Firewall.vmx". | * In VMWare workstation, click "Open a Virtual Machine" to open "WFilter NG Firewall.vmx". | ||
| − | [[File:vmware_image1.png| | + | [[File:vmware_image1.png|600px]] |
* Review the virtual machine settings. | * Review the virtual machine settings. | ||
| − | [[File:vmware_image2.png| | + | [[File:vmware_image2.png|600px]] |
* Boot this virtual machine, choose "I copied it". | * Boot this virtual machine, choose "I copied it". | ||
[[File:vmware_image3.png|450px]] | [[File:vmware_image3.png|450px]] | ||
* Successfully booted. | * Successfully booted. | ||
| − | [[File:vmware_image4.png| | + | [[File:vmware_image4.png|600px]] |
| + | |||
| + | = Setup = | ||
| + | * Set a LAN pc to static IP address "192.168.10.2", mask "255.255.255.0", gateway "192.168.10.1". | ||
| + | * Type http://192.168.10.1 in your browser to open web UI. | ||
| + | |||
| + | [[File:vmware_image5.png|600px]] | ||
| + | |||
| + | * Set a valid static IP for WAN interface and a correct gateway. | ||
| + | |||
| + | DO NOT choose "Bridge" here because this vm can not act as a network bridge. | ||
| + | |||
| + | [[File:vmware_image6.png|600px]] | ||
| + | |||
| + | = Usage = | ||
| + | Please note: | ||
| + | * This vm has two bridged adapters, one has no IP assigned(WAN), another is assigned with IP 192.168.10.1(LAN interface, DHCP enabled). | ||
| + | * To manage other LAN clients, you need to modify client device gateway to WFilter NGF("192.168.10.1"). There are two solutions: | ||
| + | ** Static IP: modify clients IP to 192.168.10.x, with gateway 192.168.10.1. | ||
| + | ** Dynamic IP: since WFilter already has DHCP enabled, you only need to shutdown your existing DHCP. So new connected clients will take WFilter NGF as gateway. | ||
| + | |||
| + | = Extension = | ||
| + | |||
| + | The 2GB disk can only record usage and reports for 2-3 days(100 clients). You can extend the vm for more clients, please check: [[Installation_of_WFilter_ROS|Hardware Requirements]] | ||
| + | Please follow below steps to add a harddisk: | ||
| + | |||
| + | * Add a 100GB harddisk. | ||
| + | [[File:vmware_image7.png|600px]] | ||
| + | |||
| + | [[File:vmware_image8.png|600px]] | ||
| + | |||
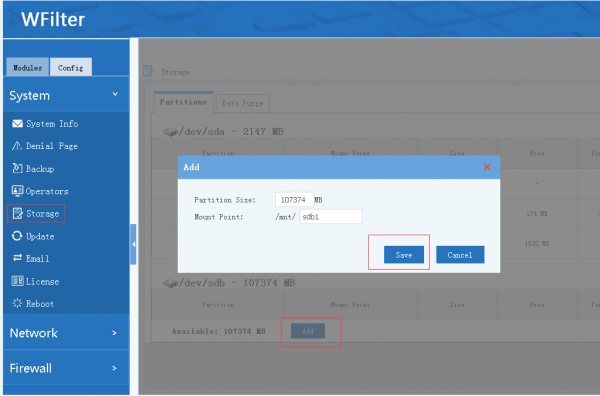
| + | * Add partition for this new disk. | ||
| + | |||
| + | [[File:vmware_image9.png|600px]] | ||
| + | |||
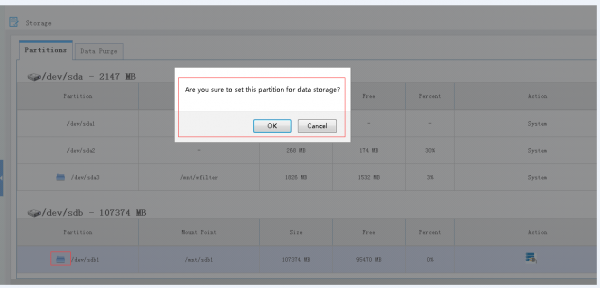
| + | * Set this partition for data storage. | ||
| + | |||
| + | [[File:vmware_image10.png|600px]] | ||
| + | |||
| + | * Apply the settings then you can record usage and report for more days. | ||
| + | |||
| + | [[Category:Installation]] | ||
| − | + | = Links = | |
| + | * [https://www.youtube.com/watch?v=06piJPA6RB8 Youtube: How to setup a virtual firewall for your network?] | ||
Latest revision as of 15:51, 29 June 2017
Contents |
[edit] 1 Introduction
We do provide a pre-built VMWare image of WFilter NG Firewall. In case you want to preview WFilter NG Firewall without installation, you can download this vmware image of WFilter NG Firewall.
Please note:
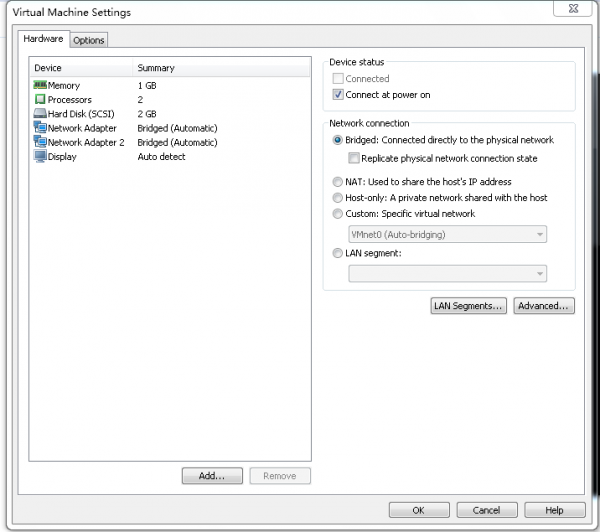
- This vm has 1GB RAM and 2GB disk. Only for small networks(less than 50 clients) or features preview.
- Two bridged adapters, one has no IP assigned(WAN), another is assigned with IP 192.168.10.1(LAN interface, DHCP enabled).
- Since these two bridged adapters are based on same physical adapter. You can only get half thoughput of the physical adapter.
- You also can build the virtual machine by yourself, please check: Install WFilter NG Firewall in a Virtual Machine
[edit] 2 Import Steps
- Download the zip file, unzip it into a directory.
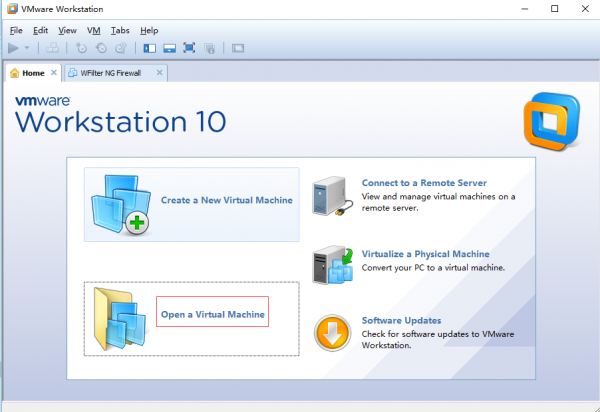
- In VMWare workstation, click "Open a Virtual Machine" to open "WFilter NG Firewall.vmx".
- Review the virtual machine settings.
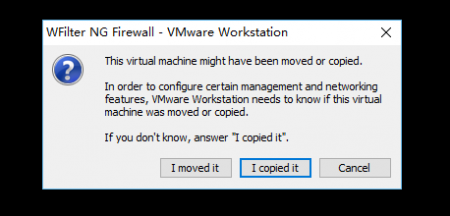
- Boot this virtual machine, choose "I copied it".
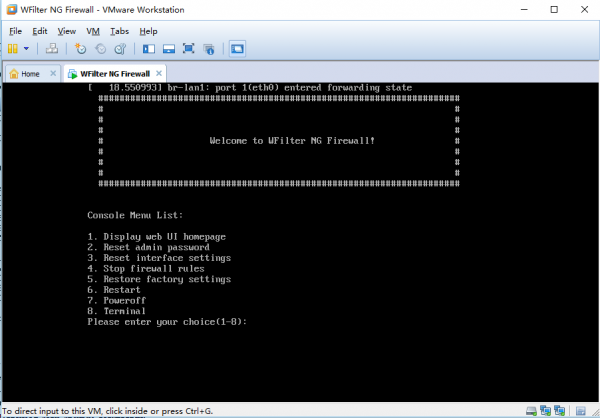
- Successfully booted.
[edit] 3 Setup
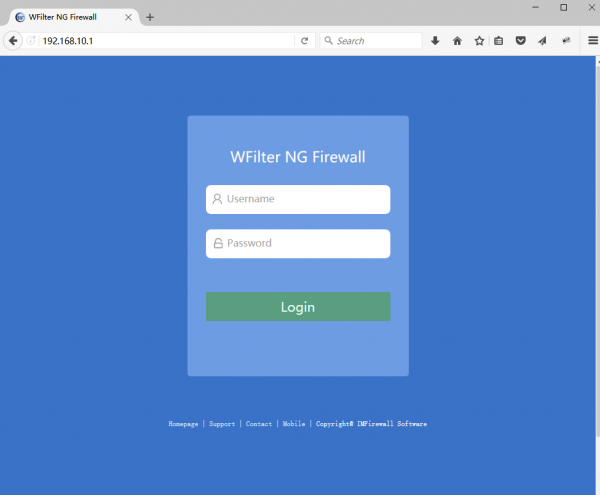
- Set a LAN pc to static IP address "192.168.10.2", mask "255.255.255.0", gateway "192.168.10.1".
- Type http://192.168.10.1 in your browser to open web UI.
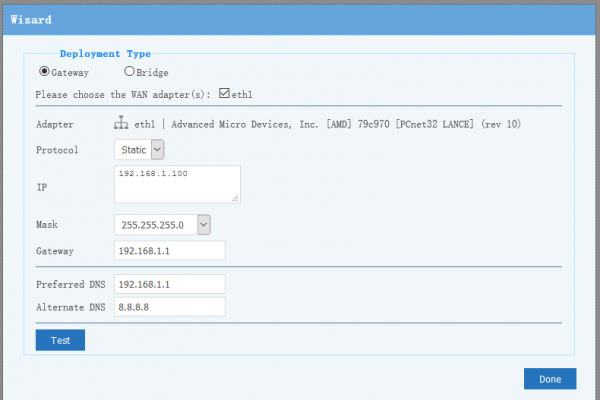
- Set a valid static IP for WAN interface and a correct gateway.
DO NOT choose "Bridge" here because this vm can not act as a network bridge.
[edit] 4 Usage
Please note:
- This vm has two bridged adapters, one has no IP assigned(WAN), another is assigned with IP 192.168.10.1(LAN interface, DHCP enabled).
- To manage other LAN clients, you need to modify client device gateway to WFilter NGF("192.168.10.1"). There are two solutions:
- Static IP: modify clients IP to 192.168.10.x, with gateway 192.168.10.1.
- Dynamic IP: since WFilter already has DHCP enabled, you only need to shutdown your existing DHCP. So new connected clients will take WFilter NGF as gateway.
[edit] 5 Extension
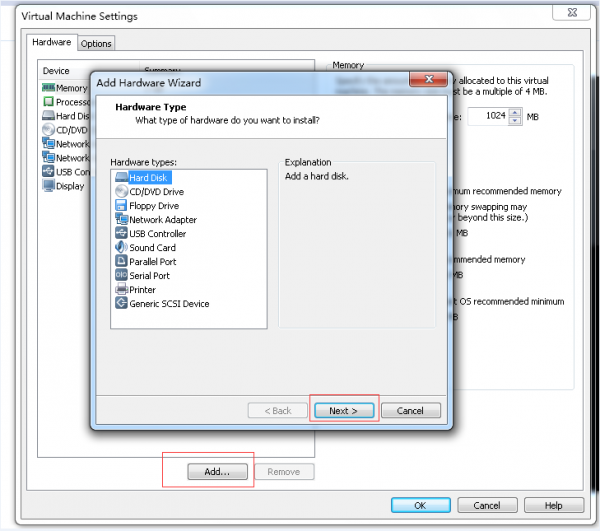
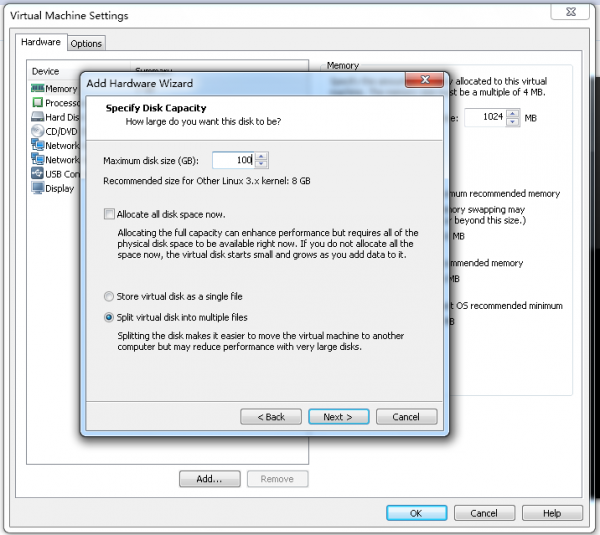
The 2GB disk can only record usage and reports for 2-3 days(100 clients). You can extend the vm for more clients, please check: Hardware Requirements Please follow below steps to add a harddisk:
- Add a 100GB harddisk.
- Add partition for this new disk.
- Set this partition for data storage.
- Apply the settings then you can record usage and report for more days.
